
Tesla Owners API refers to an application programming interface provided by Tesla which when requests are made against it, it returns information related to your Tesla vehicle. The idea is to simply use the documentation services provided by Apiary.io and their testing tool to make the actual requests and see the responses. This has been extremely helpful to me personally. Tesla multiple times has failed me with their customer service and only the data from their servers was able to prove I was right in the related conversations.
How is this useful?
To give you one example: Tesla techs kept telling me that I had an upgrade that I did not have. Only when I gave them the raw data from the API they understood that they have missed one. In another example I found out from the options codes returned from the API that I had a feature I did not know I had and it was not listed anywhere in the orientation or the invoice which came with the vehicle!
Please note that this documentation is not official and in any shape or form supported or maintained by Tesla. It is actually reverse-engineered. The documentation web site Apiary is actually owned by Oracle and it is simply a product that helps with the documentation of application programming interfaces (or APIs). Also, none of your credentials are stored or kept anywhere. They are simply passed through to Tesla servers
How does this work?
We will start with the following steps needed to get the information we want from the Tesla Owners API:
- Authenticate via the Apiary Tesla Owner JSON API and get the authentication token we need in order to make any further requests to Tesla servers.
- Once we have the token we would use that and add it to the header so our request can properly. authenticate against the Tesla servers and obtain the other pieces of information we need.
- Get the list of vehicles under your account via the authentication token.
- Using a vehicle id get the information of interest.
Step 1: Go to the Tesla Owner JSON API on Apiary.io
Click on this link and have the browser window open and handy so you can see the current one you are reading from and the new one where you would add/change values. The link is to the actual documentation website we would use to make the requests.
Step 2: Get an authentication token from Tesla
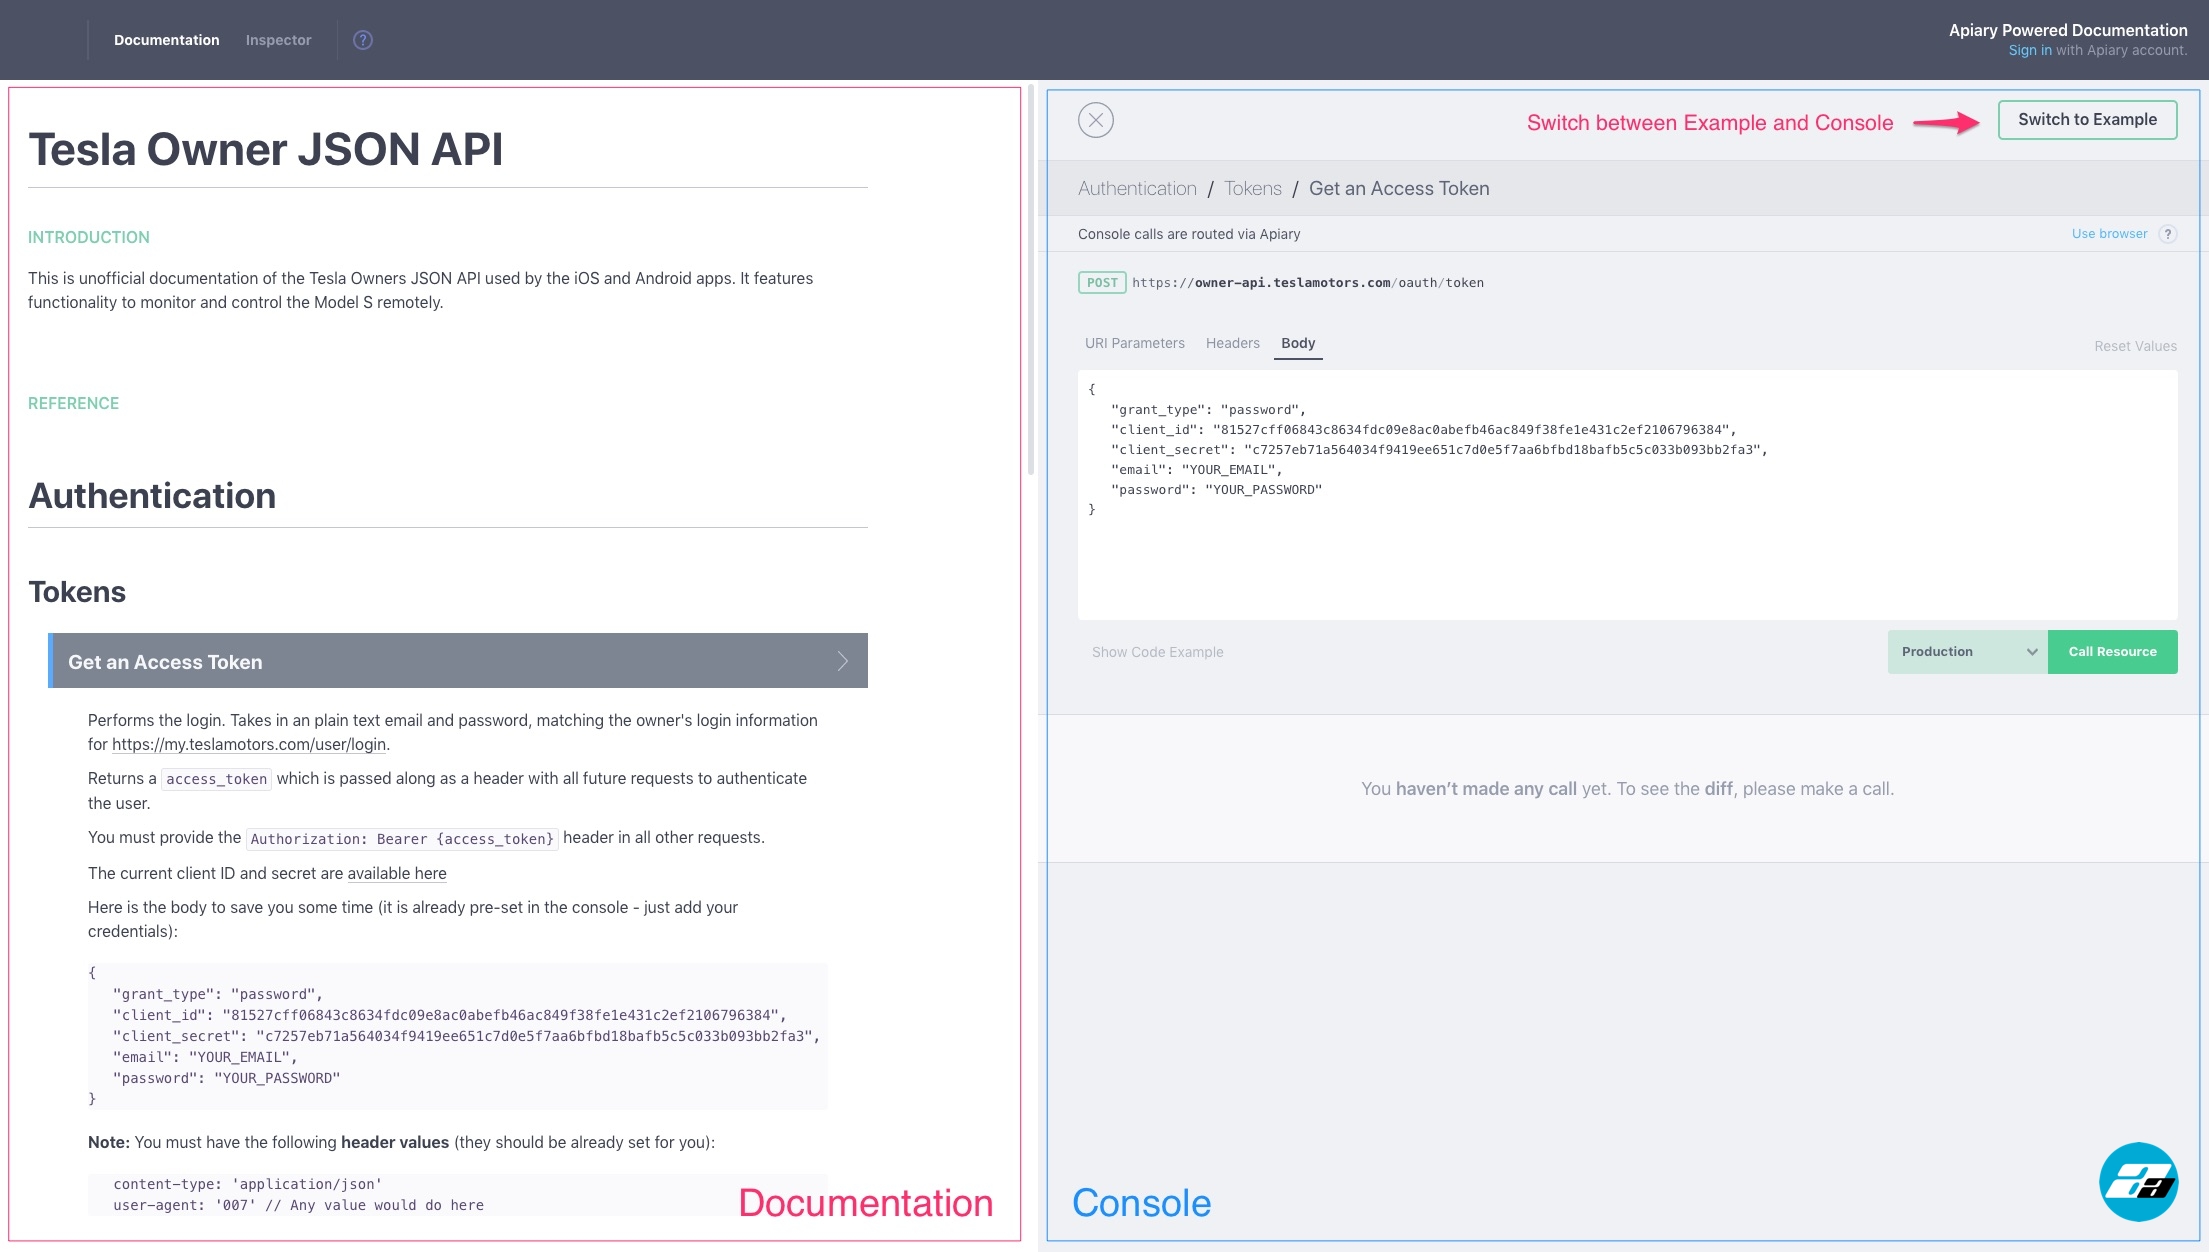
You should see the screen above. The left side of it is the actual documentation and every request is explained in detail there. On the right side is the console where we would actually perform the requests and see the responses. Since the link already pointed to the Get an Access Token request it is already open and ready to be executed on the right side. The header information is already added as well as the majority of the body. What is only missing is your email and password. Enter those where it says “YOUR_EMAIL” and “YOUR_PASSWORD” and click on the “Call Resource”. Again no information is kept on your request. Your credentials are simply passed through to Tesla from the Apiary servers. You should see the following response in the console section:
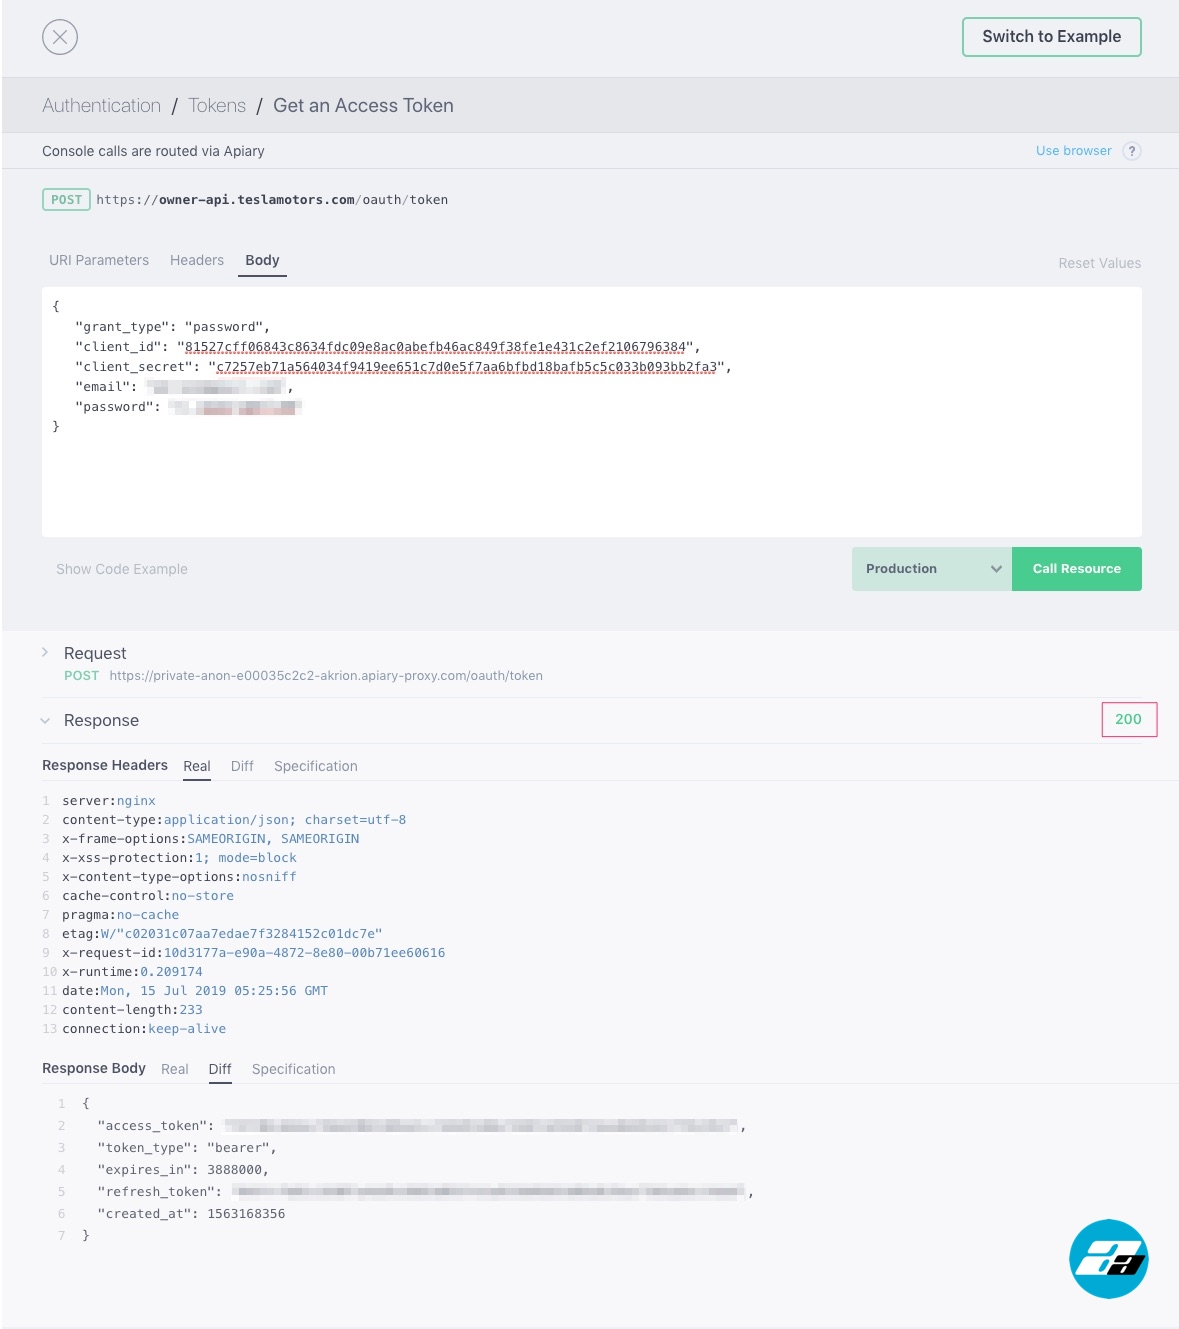
You should get a 200 response from the server (see the red rectangle in the image above). This means we did everything correctly and we now have received an authentication token from the Tesla servers. This is the access_token in the Response Body above (masked in this example). Copy the value of that access_token (copy the text between the “” for the access_token key).
Step 3: Get the list of vehicles using the token
Now that we have the token we would go to the Vehicles part of the documentation and click on the List all Vehicles request:
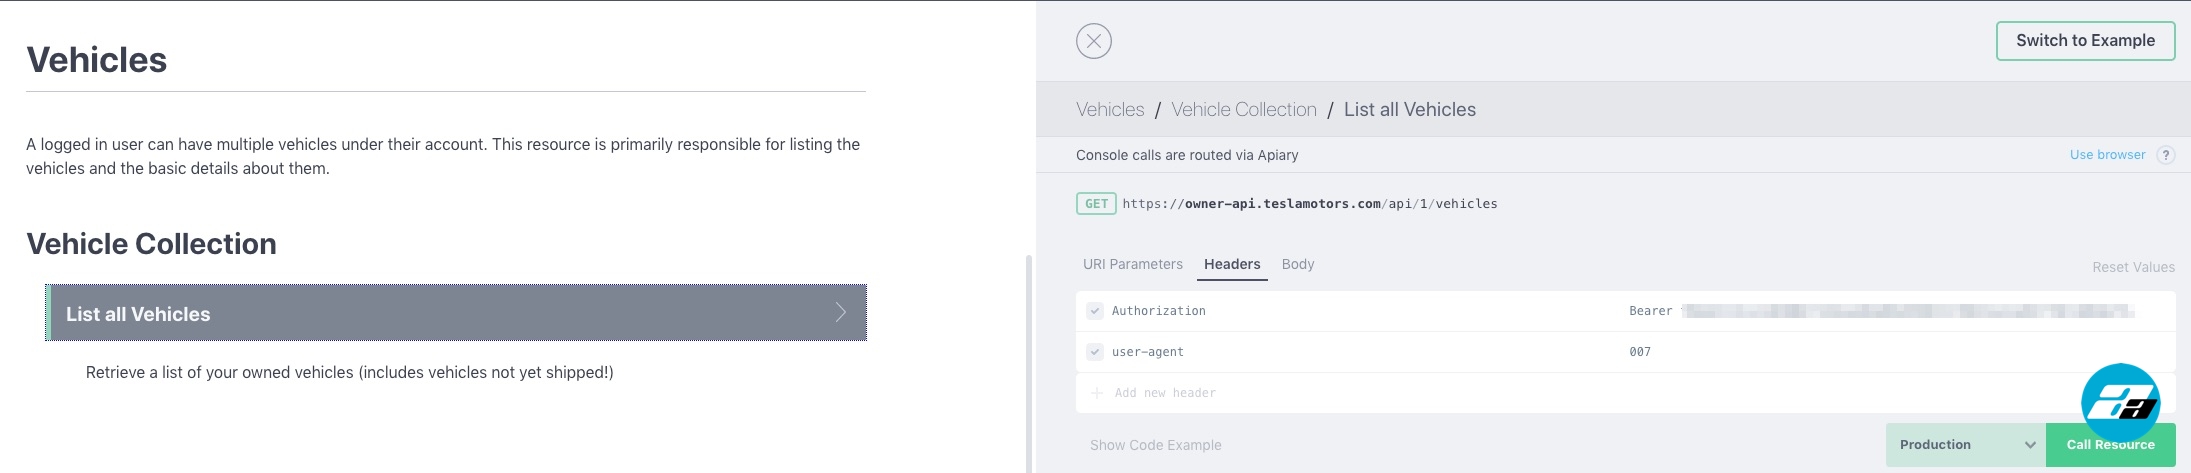
In the console section, we would go to the Headers tab and for the Authorization key, we would set the value to be: Bearer and the token we copied from Step 1. That is all you need before clicking on the Call Resource again to this time to get the list of vehicles. Note that the Authorization value should not contain double quotes etc. Should be simply Bearer followed by space and the token value from Step 1. When you are done you should see something like this in the response:
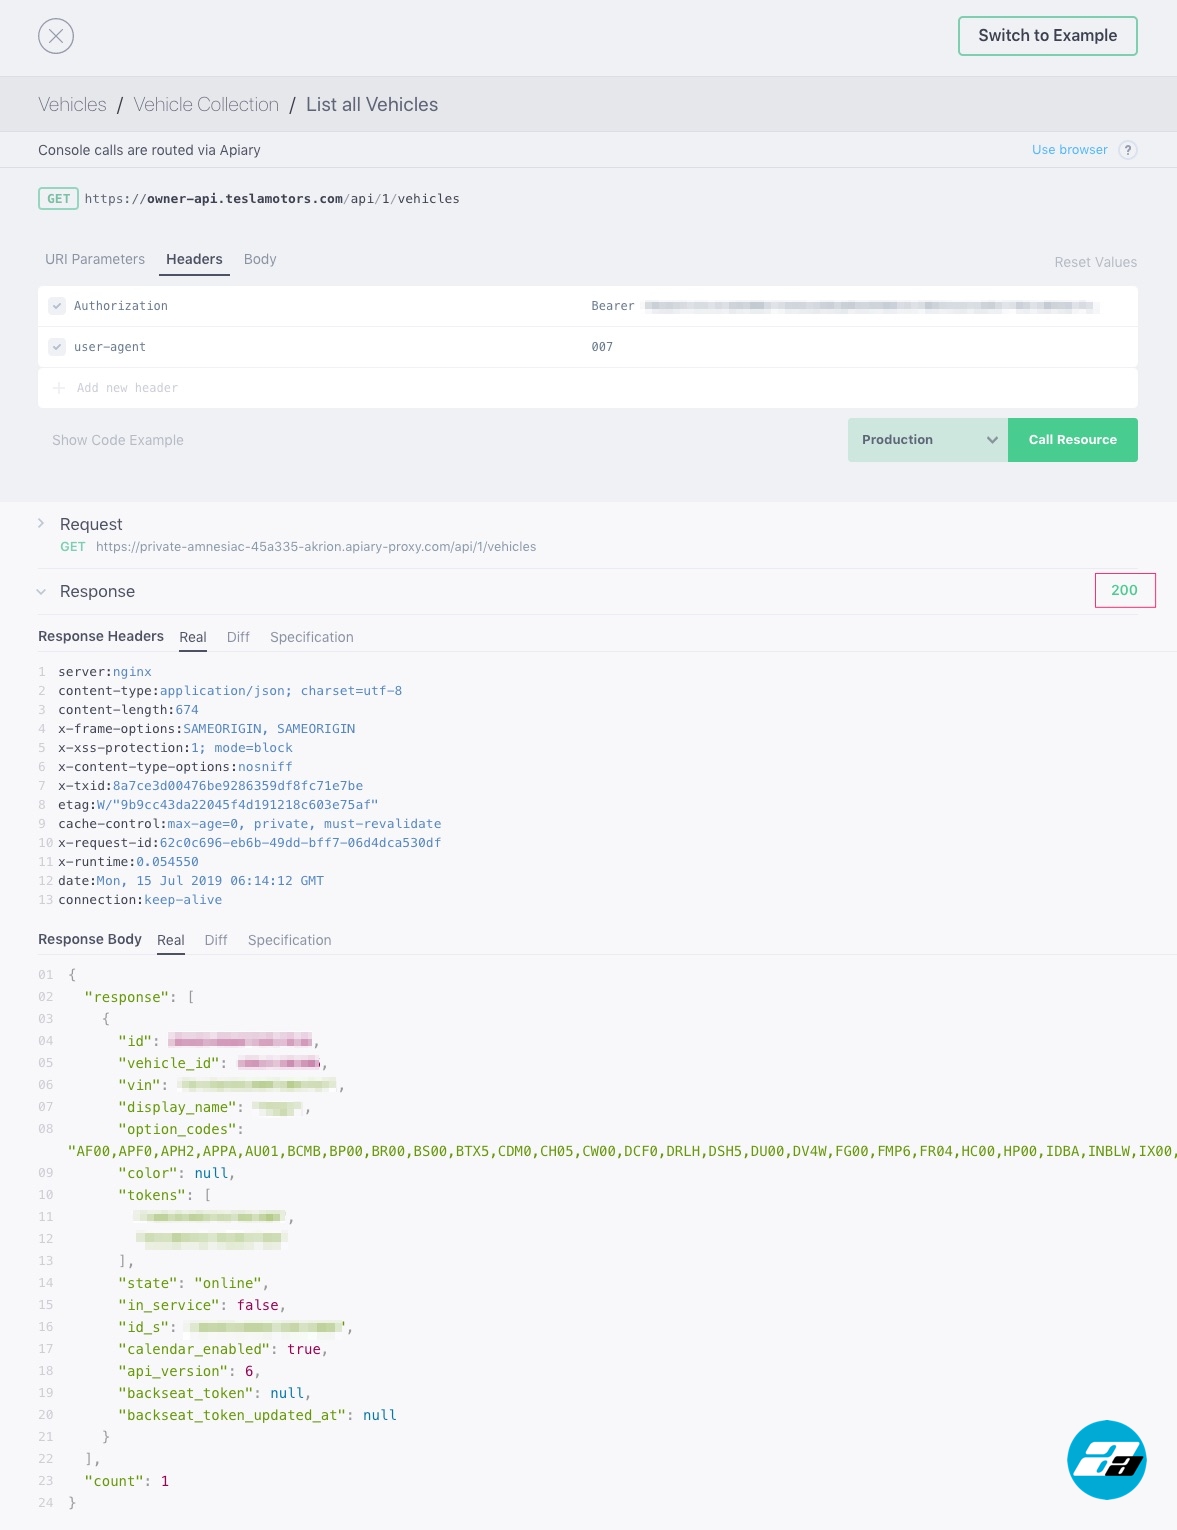
All is well! We now have received the first few details about our car. We have the VIN, the actual Id in the Tesla system, the option codes, etc. Great result for a few minutes of actual “work” right? You also can now compare and check if your option codes match your invoice :). Now that we have the vehicle list we can copy the id_s value from it and dive into the actual specific data of that vehicle.
Step 4: Using the id_s to get vehicle data
What we will do now is to utilize the token and the id_s to get any of the State and Settings data we would like. We would only do the Vehicle State in this example since all others follow the same pattern. So two things we need to go forward with this. One is the authorization token we got from step 1 and second the id_s we got from step 3. Let’s click on the Vehicle State in the State and Settings section of the documentation.
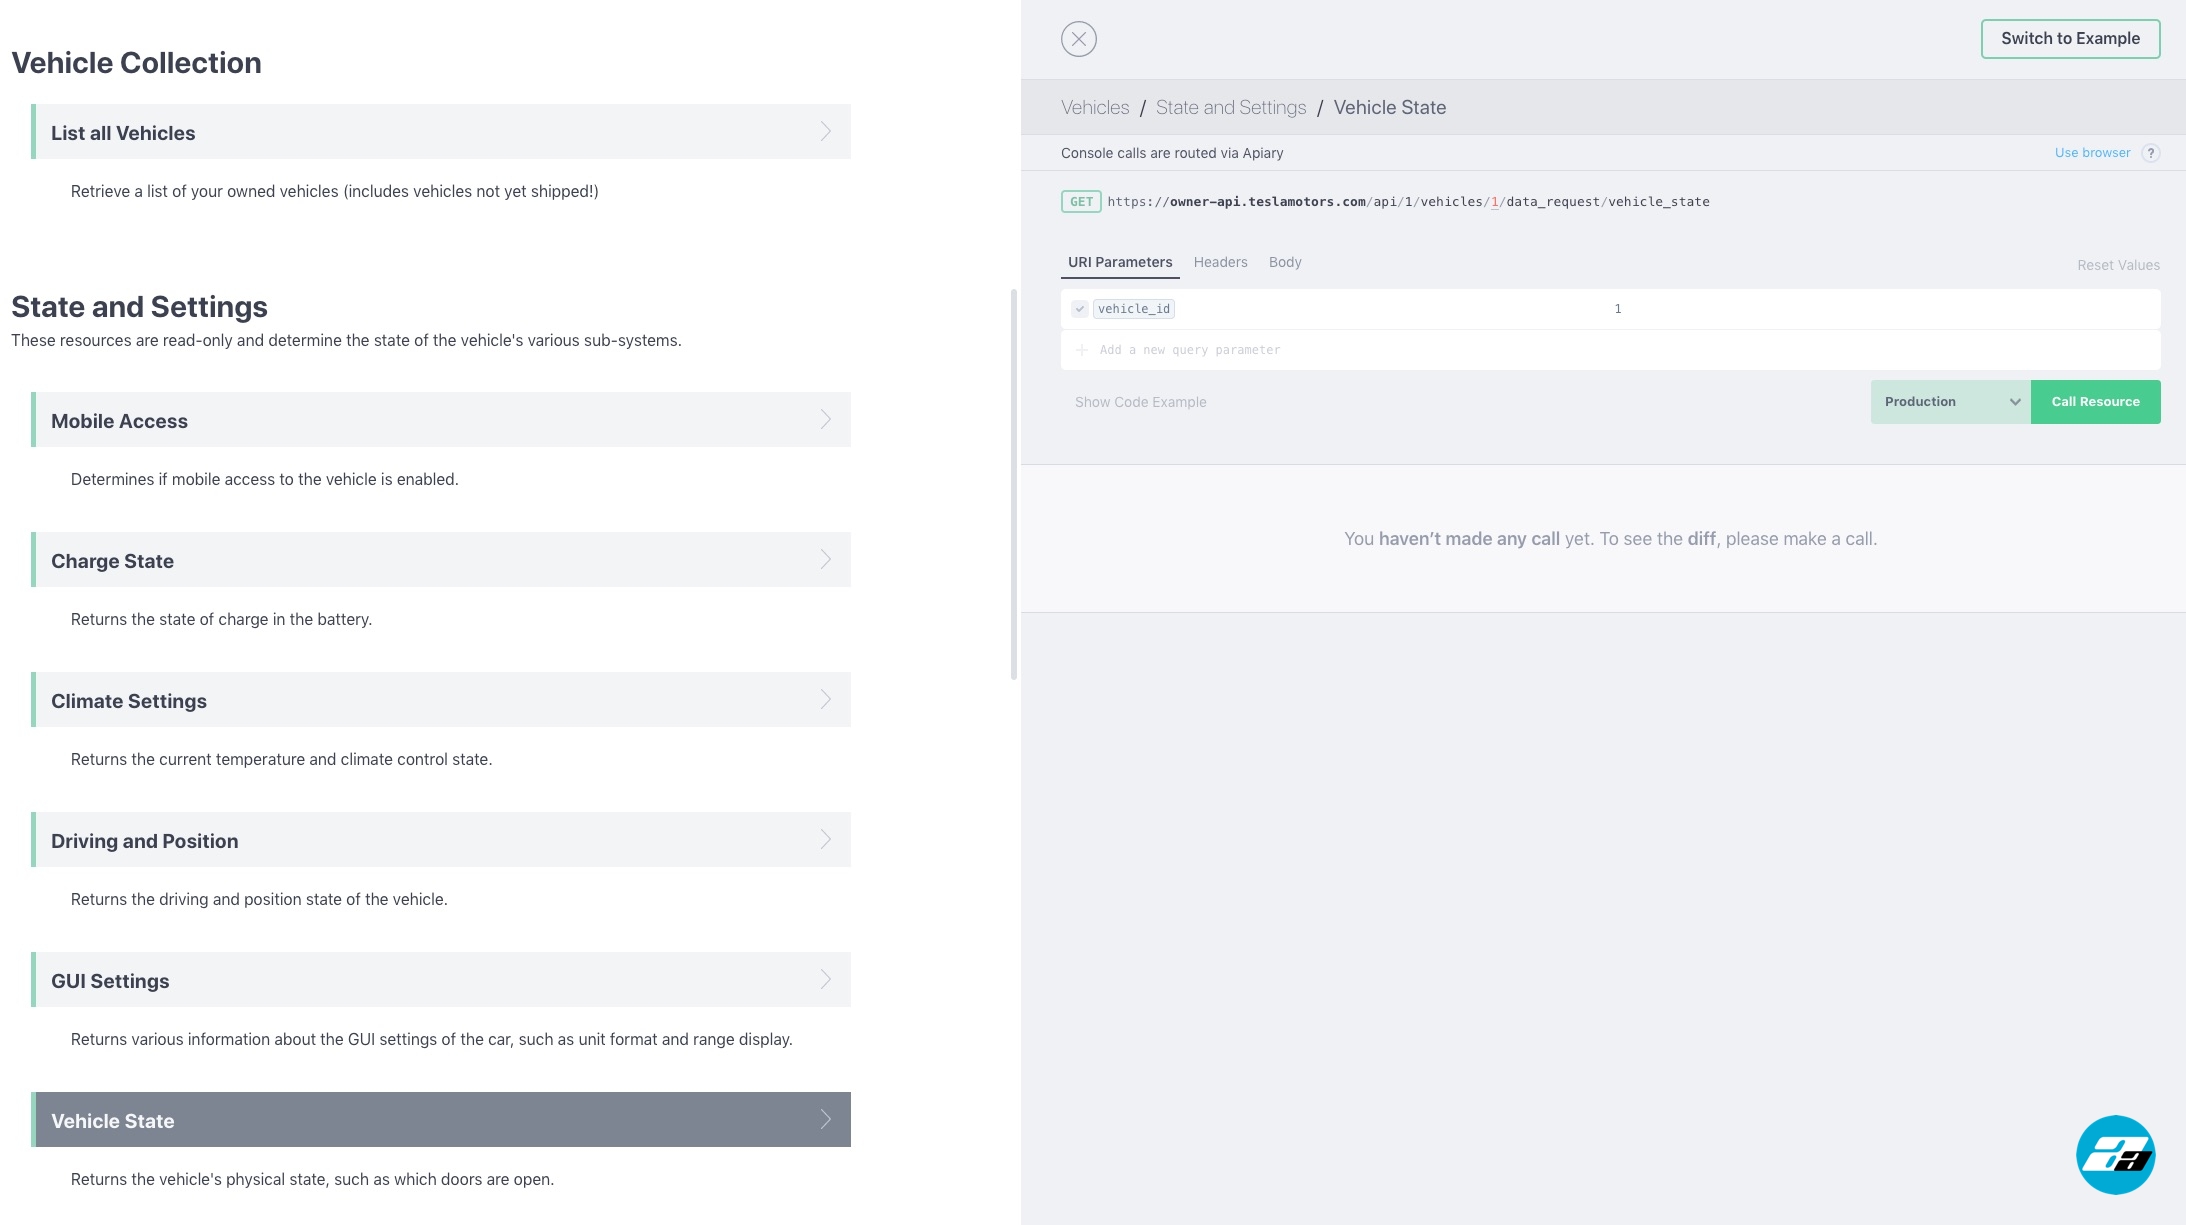
Here in the console, we would go to the URL Parameters and for the value of vehicle_id, we would set the value we got from step 3 for the id_s. Then we would click on the Headers tab and do exactly what we did in step 3. Set the Authorization key to the Bearer and the token value from step 1. Clicking on Call Resource should return a response looking like this:
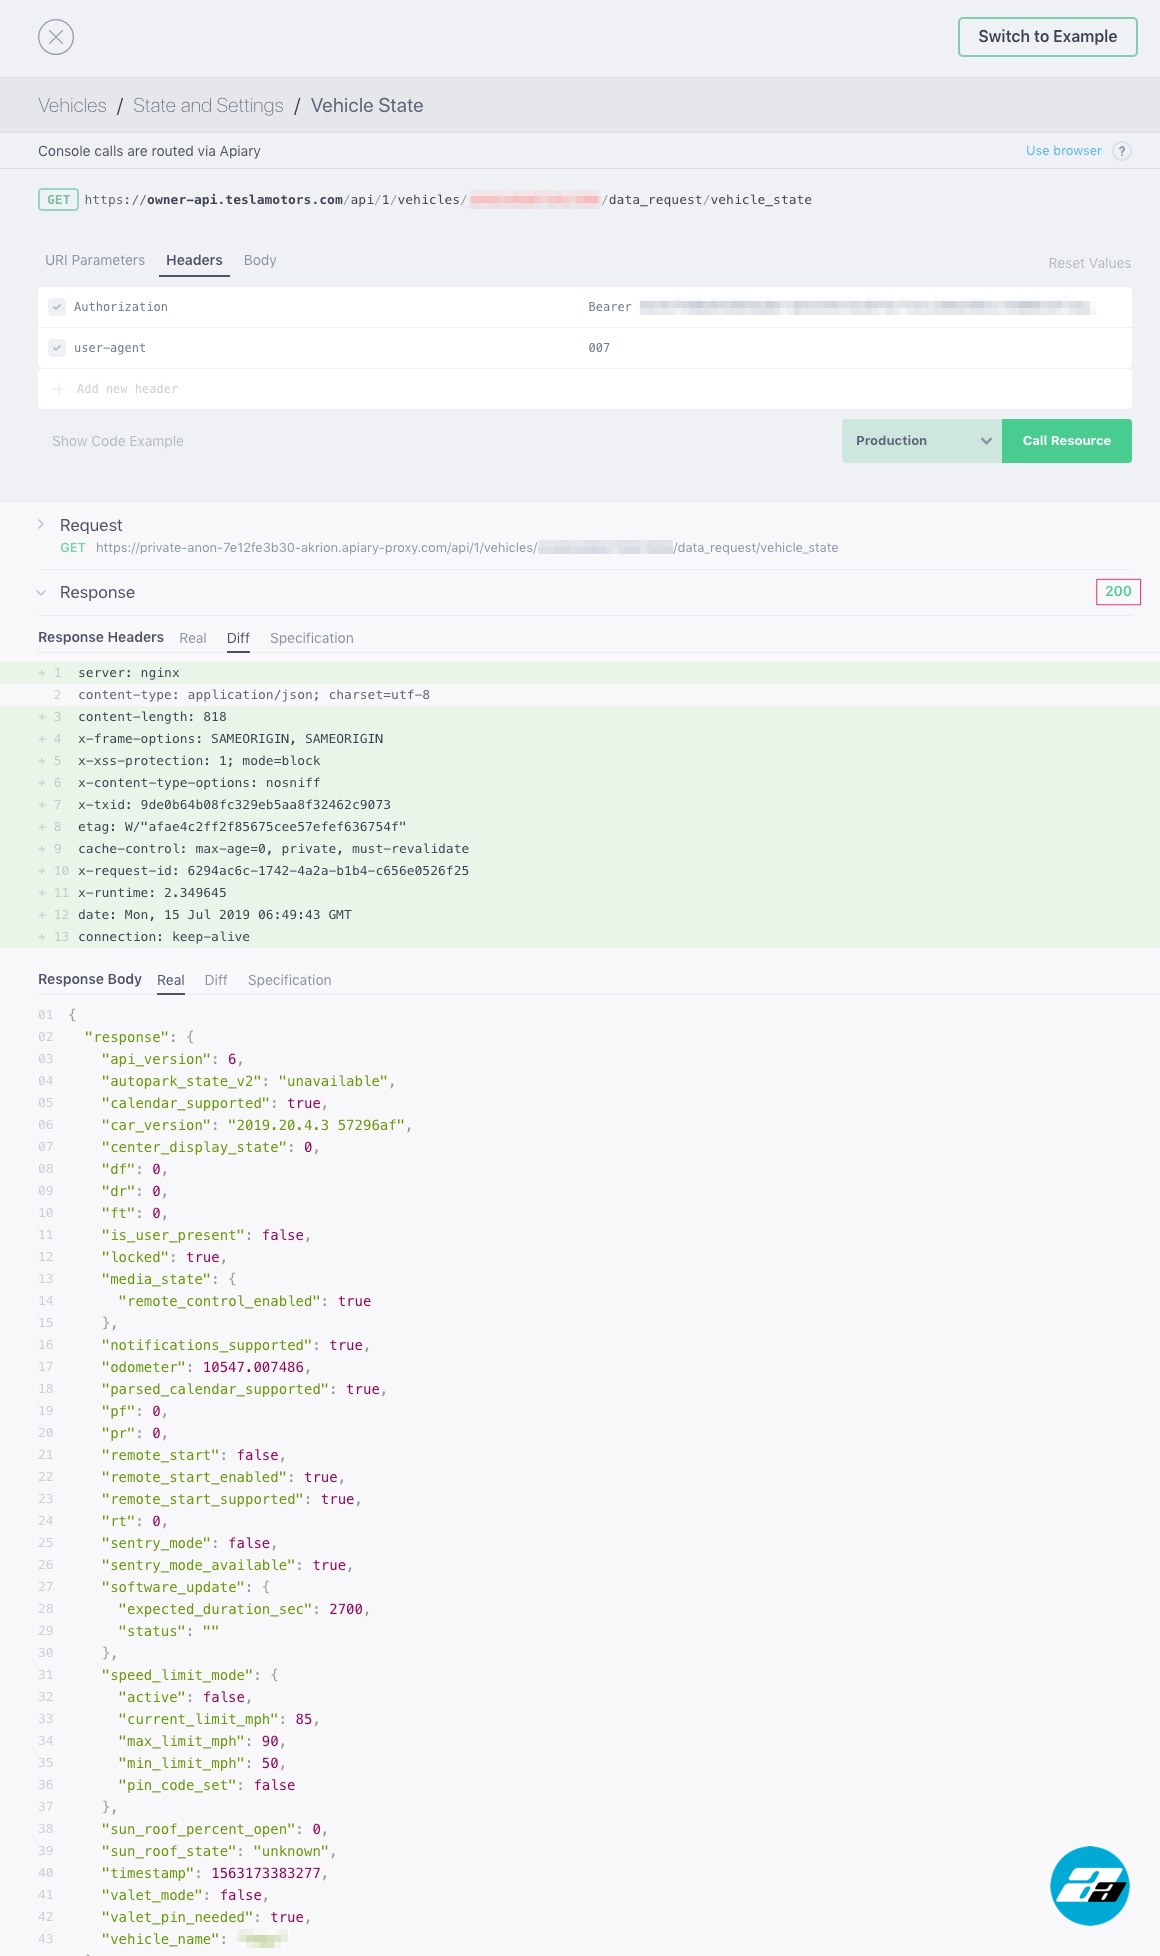
As you can see this returns a lot more data related to the actual state of the vehicle. You can now follow this example and do any of the other requests listed under the State and Settings section. For the sake of brevity, we would not cover the Vehicle Commands section. It follows the same patterns overall so you can experiment if you like it.
Hope this helps and if you have any questions do not hesitate to post a comment. I will do my best to reply promptly.
Use my referral code and save!
If you would like to receive 1,000 free Supercharger miles when you purchase your new Tesla use my referral code: http://ts.la/ilian3072


Add comment